Manual

From BotF2-Wiki
Revision as of 23:23, 22 December 2013 by Reg (Talk)

Jump to: navigation, search

Introduction

How the Manual is Arranged

Like the program that inspired it, BotF2 is not an overwhelming maze of menus or features that you may never completely master.

All game function falls into five main areas of play (including prepended Hotkey)

Wherever you are, you can jump to any of the five areas of game management using the Popup Menu (gives access to all 5 panels).


There are things to learn in each of the five management screens but they all relate to developing the different aspects of your empire.

  • Part 1 of the manual (Game Overview) introduces you to the basics of each of the five areas of game management. It should be enough to get you started.
  • Part 2 (Game Details) will be an expansion of each of the five areas of the game.
  • Part 3 of the manual (Reference) documents reference values that are helpful for expert play.

While the game is developed, Part 3 will also list the Accepted Features to ultimately be included in the game. As they become part of the game, these features will be moved from this reference to Part 2 of the manual. When the game is done, Part 3 of the manual will only contain Reference Values.


More information will also be available in Trekpedia on the web (not verified yet)


Terms in this manual:

  • PANEL – A working screen area (the entire screen display being discussed)
  • DISPLAY – A subsection of a PANEL
  • OPTIONS – Many PANELS have option buttons that change a DISPLAY in that PANEL
  • SECTOR – One of the squares on the galaxy panel
  • SYSTEM – A group of planets in a sector orbiting a sun (A “Solar System”)
  • GALAXY – All the sectors in the game you are playing


BotF2 is a labour of love and there is no charge for the program. No fees were received for any part of its development.

Part 1: Game Overview

Introduction

Star Trek BotF2 is a fan developed, enhanced tribute to the popular 1999 PC game, “Birth of the Federation” by Microprose. Birth of the Federation, more commonly abbreviated 'BOTF', was a turn-based empire-building game played within a randomly generated galaxy. This ensured no two games would be exactly alike. Players could select from one of five major empires and compete with the other four for galactic domination. These empires were the United Federation of Planets, the Klingon Empire, the Romulan Star Empire, the Cardassian Union and the Ferengi Alliance. The game was set in the Next Generation era of the Star Trek Universe.


The galaxy was laid out in numbered square sectors many of which contained solar systems inhabited by minor races and alien entities. The galaxy also contained other stellar bodies including nebulae and worm holes. Players could take a chance and enter a worm hole that would either jump them to a distant sector of the galaxy or destroy their ship.


Empires expanded by the terraforming and colonization of planets combined with diplomatic annexation or military conquest of minor races. Planetary systems could also be forcibly captured from other major empires. Play involved exploration and diplomacy to establish strategic alliances, intelligence operations, technological development and turn based combat with vessels of rival empires. Exploration was aided by player-built outposts and star bases that supported expansion into distant space. Random events, such as Borg invasions, presented additional challenges for players.


There was also a multiplayer option. In either single or multi player mode, unclaimed empires and minor races were handled by an artificial intelligence system within the program.


Unfortunately, Birth of the Federation had a notorious memory leak that caused the program to crash unexpectedly. It also appeared to bog down the longer it was played. In this situation, scrolling of the map became agonizingly slow making it necessary to save and restart the game to clean up memory allocation.


BotF2 (BOTF II)

The BotF2 sequel is in its beginning stages of development. Notable improvements include:

  • Higher definition graphics and resolution-scalable interfaces.
  • More and larger map size choices (the current largest is 80 by 80 or 6400 sectors).
  • Semi-transparent windows.
  • Enhanced realism / beauty of the solar systems.
  • Automatic detection and adjustment to the size of the monitor.
  • Cleaner User Interface.
  • Broader historic time span from the Enterprise series to Voyager (BOTF covered the Next Generation and Deep Space 9).
  • The ability to plot an unlimited nonlinear course for a ship or task force using the CTRL key.
  • More buildable technological elements tailored to individual solar systems and races.
  • More star base options/types.
  • More ship classes and models.
  • Ships can be renamed.
  • The ship construction queue is separate from the general construction queue.
  • Unlimited capacity in each system construction queue.
  • New diplomacy interface, interactions, and options.
  • New technology interface with improved database information.
  • Built-in automatic program updater.
  • The addition of the Dominion as a major empire (Replacing the Ferengi who are now a minor race, albeit a particularly powerful one).
  • Many more minor races are included, along with unique buildings, bonuses, and ships.
  • The minor races will be capable of expanding and forming their own mini-empires.
  • Ships will have the ability to scan systems.

These are some of the improvements to the game to date with more on the way.


>> Some of the Beautiful New Race Emblems for the Game <<


Installation

The installation of the game is straight forward.


The three stages to installation:

  • Installing a Microsoft utility called NET Framework.
  • Unzipping the downloaded file into any desired folder.
  • Creation of a desktop icon shortcut to the game in its folder.


NET Framework can be found at: http://www.microsoft.com/downloads/details.aspx?FamilyId=AB99342F-5D1A-413D-8319-81DA479AB0D7&displaylang=en


To Install the Program:

  • Go to the Zip file for BotF2 that you downloaded from the site and double click on it.
  • Select: Extract All Files (this is small in windows XP) from the Folder options on the left
  • You get a window with: Welcome to the Compressed (zipped) Folders Extraction Wizard
  • Click the Next> button at the bottom and get the following window.
  • Enter C:\Program Files\Star Trek BotF2 as you see in the example to the left. *Then Click Next> at the bottom.
  • You do not have to place the program in C:\Program Files. This is just one suggestion.

To make a desktop Icon:

  • Click the Windows Start Button
  • Double Click My Computer
  • Double Click the C: Drive
  • Double Click on Program Files (or your directory for the game)
  • Find and Double Click on the folder Star Trek BotF2
  • Find the Icon for BotF2Client.exe in the folder
  • Right click on it and select create shortcut which is 4th from the bottom -- You will get this
  • Click on the blue area and type: “Star Trek BotF2” (replacing “Shortcut to BotF2 Client.exe Shortcut”)
  • Hit the enter key and then use your pointer to drag it to your desktop
  • Close all the windows

Startup

Starting a Single Player Game

Double click on the BotF2 desktop icon you made. The program may download an update after you start it.

Once the game is running you will see the following Menu in the lower right corner.

In the example all the options are highlighted for clarity. In actual practice, some are dark when not available.


  • CONTINUE: Return to current game (i.e. after saving)


  • Start a new SINGLE PLAYER Game


  • Start a new MULTIPLAYER Game


  • LOAD a saved single player GAME OR LOAD a saved multiplayer GAME


  • SAVE a single player GAME OR SAVE a multiplayer GAME


  • 1) Graphic OPTIONS 2) Music and Audio OPTIONS 3) Updater OPTIONS


  • Game Programming and Design CREDITS


  • RETIRE from a Game


  • EXIT Program


Click on SINGLE PLAYER and you get the following self-explanatory menu.


Starting a Multi Player Game

Click on MULTIPLAYER and you get the following menu


To host a multiplayer game:


Enter your player name and select HOST GAME at the bottom.

Your game will then appear to other potential players in the box labeled Servers on Network.


For other players to see your host game they can enter your IP address

(Example 192.168.1.22 in the graphic) in the area labeled Direct Connect:


Once you select HOST GAME you will be given a new screen with similar game options as

the SINGLE PLAYER game. Select your options. Wait for other network players to join the game.

After all their names appear on screen,

launch the game with the button in the lower right corner of the main panel.


To Join a Game:

If your program detects other games on the network it will show them in the large box labeled Servers on Network.

You can select one and click on JOIN GAME at the bottom.

You will then be given the option as to which empire you want to play.


Loading a Previously Saved Game

Click on LOAD GAME and you get the following menu


As you highlight your saved games,

information regarding the game is displayed to the right in yellow.


This list contains ALL saved games, whether single or multiuser.


Auto: BotF2 saves each turn for recovery from crashes.

Highlight and load this option to take up where you left off in the last game you were playing.
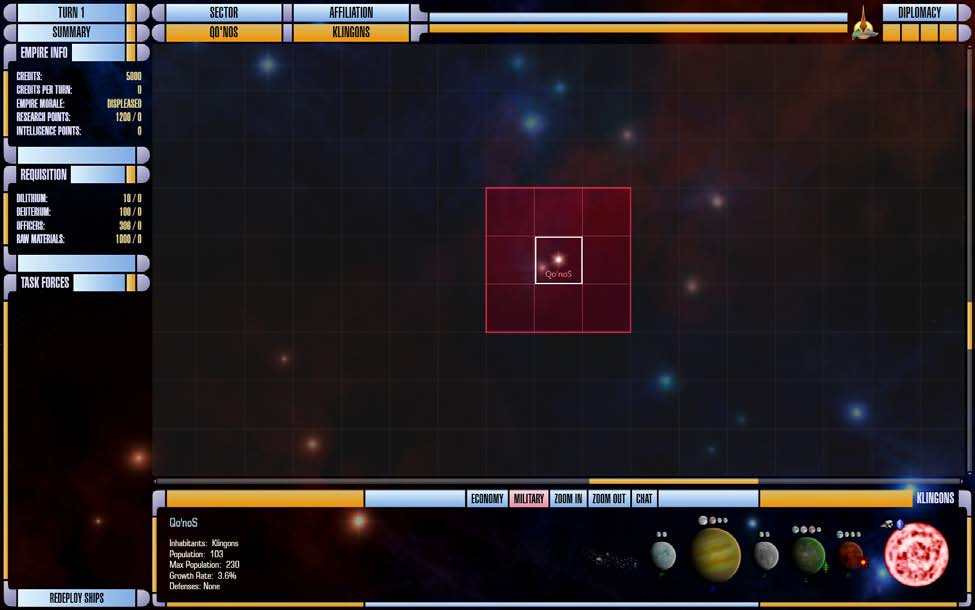


The Game Overview

Galaxy Panel

Once the game has started you will see the galaxy panel as seen below.

Your selected empire begins in the solar system in the center of the red area (The area is green if Romulan or blue if Federation etc).

Using the scroll wheel on your mouse OR the Zoom in / Zoom out buttons at the bottom you can zoom the galaxy map in and out.

Each map square is a sector of space that may be highlighted with your cursor. Sectors require exploration.

If you double click on an unexplored or empty sector it will center in the galaxy display area.

If you double click on one of your colonized sectors you switch to the system management display.


Important Icons


The blue crystal icon indicates dilithium in the solar system.

The icon to its left indicates the presence of raw materials in the system.

Both are desirable for ship construction.

The size of the sun image is scaled to the number of planets in the system (maximum of 10).

Planet Types (B, G, M, K, J etc) – List on Page 28

Planets that are terraformed have green letters

Planets that cannot be terraformed have blue letters

Planets that can be terraformed will have red letters

NOTE: the terraforming option is not yet available

Moons come Small, Medium and Large. Any planet can have up to 5 moons.

Moons will add to your system population when a structure is built on them.

The small sunburst icon indicates extra energy production capacity for the entire system.

The small green plant icon indicates extra food production capacity for the entire system.

Asteroids (far left) can be mined for raw materials. The asteroid sweeper increases this by 40% (in build menu page 17).

Systems with gas giants (Type B planets) or crystalline planets generate 10 deuterium/turn/planet.

Other stellar bodies that can appear in sectors include Neutron Stars, Quasars, Radio Pulsars, X-Ray Pulsars, Black Holes, Nebulae, Rogue Planets and eventually wormholes.

Rogue planets will be found in Nebulae much like the Omarion Nebula where the Dominion home world is found.


Summary display - Galaxy Panel


Place on Screen:

  • Click to TURN to play turn (you are about to play TURN 1).


  • Click for SUMMARY of events that occurred at last turn.
    • Summary of entire empire:
      • Credits can be used for diplomacy with minor races but will have minor effect on empires. They are also used for ship maintenance. Not implemented yet.
      • Current Credits per Turn (for the previous turn). Credits are taxes paid by the empire’s population and increase as your population increases.
      • Morale: Empire population average. See page 29.
      • Research Points are displayed as total accumulated followed by current points per turn after the slash (from the powered research facilities in your empire).
      • Intelligence Points are similarly based on the total number of Intel facilities in your empire.


  • Requisition summary for entire empire: The Requisition materials are necessary for ship building. (Note: This example also shows the starting resources for each player at the beginning of a new game at the beginning tech level. You get more if you start at higher levels.)
    • Dilithium, deuterium (starship fuel) and raw materials are stockpiled and available to the entire empire.
      • Dilithium on hand / Produced last turn
      • Deuterium on hand / Produced last turn
      • Officers on hand / Trained last turn
      • Raw Materials on hand / Mined last turn


Make sure:

  • The dilithium refinery is built and powered.
  • The deuterium plant is built and powered.


Important GALAXY display buttons


  • ECONOMY: This button changes the GALAXY display to show TRADE ROUTES. The Task Force display changes to show trade route(s) available in your currently highlighted system.
  • MILITARY: This is the default setting when the game starts. The button replaces the TRADE ROUTES display (in the lower left corner) with the TASK FORCES display.
  • ZOOM IN: This button magnifies the GALAXY display. Each sector appears bigger and its text larger.
  • ZOOM OUT: This button lets you see more sectors in the available space. The detail gets smaller and text can become too small to read.
    • Note: the ZOOM IN and ZOOM OUT buttons have the same effect as the scroll wheel on pointing devices (mouse or track ball).
  • Multiplayer chat: Select the CHAT button to communicate with others in a multiplayer game. The option is given to either send a message to all players or select a subset of players. The SYSTEM display changes to a text line for typing a message. At this time the CHAT button does not highlight pink when it is selected and either the MILITARY or ECONOMY button appears to remain active. You must re-click the CHAT button to close the text space and cancel CHAT mode.


ECONOMY button - Trade Routes


Place on Screen:

As a system’s population expands a new trade route is created at multiples of 150.


The graphic at left shows an UNASSIGNED trade route for the solar system currently highlighted.

Assigning a trade route increases the number of credits accumulated with each turn.


Your trade routes are seen by selecting the ECONOMY button between the galaxy and system display.

Detail on trade routes, trading and how to assign them is discussed on page 26.


MILITARY button


You will often jump between the ECONOMY and MILITARY buttons in managing your empire.

When the MILITARY setting of the GALAXY display is selected, a list of the ships you have (if any) in a selected sector appears in the lower left corner of the GALAXY panel under the title TASK FORCES (see next section). The graphic at the right shows a sector (Sol) with one or more ships in it as indicated by the Starfleet emblem in the corner.

In the original BOTF, switching from MILITARY to ECONOMY hid the icons for military ships.


Task Force Deployment

The following display is in the lower left corner of the GALAXY panel when in MILITARY mode.


Place on Screen:

The task force display of the main galaxy interface lists the ships in the currently selected sector. In the example screen shot you might think of each individual ship as its own “task force” as none of them are grouped yet. However, you can REDEPLOY more than one ship into a Task Force group.


The only purpose of Redeployment is to make ship movement easier. Grouping in task forces, saves you the tedium of individually directing each ship to the same place. At the bottom of the display is the button to REDEPLOY SHIPS.


When you select the REDEPLOY SHIPS option, the GALAXY display is replaced by a display showing the ships listed in the Task Forces display (seen at left). The REDEPLOY SHIPS button also changes to ACCEPT DEPLOYMENT as seen above.


< - >


Click on ACCEPT DEPLOYMENT to return to the GALAXY display after redeploying your ships.


Detail on how to redeploy ships is described on page 25 (Part 2) of this manual and is currently under revision by the programmer.


In BotF2, ships can be renamed (this currently has a bug in the programming). The new name will appear in place of the text you see in the TASK FORCES display example above. Thus, the “Heavy Cruiser II” might be renamed as “NCC 530 USS Venture.”


In renaming ships you may want to adopt a convention of numbers for the different types of starships so that you can identify what type of ship it is. An example would be numbers in the 500’s for Heavy Destroyer II’s. You could also say HDII USS Venture or something that makes sense to you.


Ship's Status

While you are in REDEPLOY SHIPS mode you can look at each ship’s status by selecting one of the ships in the vertical TASK FORCES list.

The status of all the ships appears in the display at the bottom of the panel as depicted in the picture to the left.

The three colored indicators to the left of each ship are (from left to right):

  • Shield strength (maroon)
  • Hull integrity (green)
  • Deuterium (yellow)

Ships draw deuterium from your empire’s stockpile when they are moving inside their refueling range (shipyards and outposts). They only consume fuel reserves when outside the refueling range.

Place on Screen:


Ship's Orders


Place on Screen:

Right clicking on a ship in the task force panel brings up options appropriate to the ship in its current location.

Most ships have weapons but currently not all have the option to engage (enter battle with rival ships).

  • Battle capable ships can:
    • Engage
    • Avoid
    • Escort (if other ships are in the same sector)
  • Construction ships can: (this currently has a bug in it and may cause crashes)
    • Avoid
    • Build station (the selection of station(s) to build is limited to your tech level)
  • Colony ships can:
    • Engage
    • Avoid
    • Escort or Colonize system (if they are in a system that can be colonized)
  • Hospital ships can:
    • Avoid
    • Engage
  • Transport ships can:
    • Avoid


Ship’s scanning:

Scan Power is not the same as Sensor Range. Range signifies the outer limits a scan can reach. Scan Power signifies the accuracy and resolution of a scan. Scout ships have the highest resolution scanning capability.