Maybe out of this site it's possible to deliver next manual as *.html (to avoid info redundance and with option of freshest info by online access). Therefore a ingame button with "?" maybe right top or buttom would be helpful...so by (one) short click manual is available
Introduction
|
How the Manual is Arranged
Like the program that inspired it, BotF2 is not an overwhelming maze of menus or features that you may never completely master.
All game function falls into five main areas of play (including prepended Hotkey)
Wherever you are, you can jump to any of the five areas of game management using the Popup Menu (gives access to all 5 panels).
|
|
There are things to learn in each of the five management screens but they all relate to developing the different aspects of your empire.
- Part 1 of the manual (Game Overview) introduces you to the basics of each of the five areas of game management. It should be enough to get you started.
- Part 2 (Game Details) will be an expansion of each of the five areas of the game.
- Part 3 of the manual (Reference) documents reference values that are helpful for expert play.
While the game is developed, Part 3 will also list the Accepted Features to ultimately be included in the game. As they become part of the game, these features will be moved from this reference to Part 2 of the manual. When the game is done, Part 3 of the manual will only contain Reference Values.
More information will also be available in Trekpedia on the web (not verified yet)
|
|
Terms in this manual:
- PANEL – A working screen area (the entire screen display being discussed)
- DISPLAY – A subsection of a PANEL
- OPTIONS – Many PANELS have option buttons that change a DISPLAY in that PANEL
- SECTOR – One of the squares on the galaxy panel
- SYSTEM – A group of planets in a sector orbiting a sun (A “Solar System”)
- GALAXY – All the sectors in the game you are playing
BotF2 is a labour of love and there is no charge for the program. No fees were received for any part of its development.
|
Game Overview
Introduction
Star Trek BotF2 is a fan developed, enhanced tribute to the popular 1999 PC game, “Birth of the Federation” by Microprose. Birth of the Federation, more commonly abbreviated 'BOTF', was a turn-based empire-building game played within a randomly generated galaxy. This ensured no two games would be exactly alike. Players could select from one of five major empires and compete with the other four for galactic domination. These empires were the United Federation of Planets, the Klingon Empire, the Romulan Star Empire, the Cardassian Union and the Ferengi Alliance. The game was set in the Next Generation era of the Star Trek Universe.
The galaxy was laid out in numbered square sectors many of which contained solar systems inhabited by minor races and alien entities. The galaxy also contained other stellar bodies including nebulae and worm holes. Players could take a chance and enter a worm hole that would either jump them to a distant sector of the galaxy or destroy their ship.
Empires expanded by the terraforming and colonization of planets combined with diplomatic annexation or military conquest of minor races. Planetary systems could also be forcibly captured from other major empires. Play involved exploration and diplomacy to establish strategic alliances, intelligence operations, technological development and turn based combat with vessels of rival empires. Exploration was aided by player-built outposts and star bases that supported expansion into distant space. Random events, such as Borg invasions, presented additional challenges for players.
There was also a multiplayer option. In either single or multi player mode, unclaimed empires and minor races were handled by an artificial intelligence system within the program.
Unfortunately, Birth of the Federation had a notorious memory leak that caused the program to crash unexpectedly. It also appeared to bog down the longer it was played. In this situation, scrolling of the map became agonizingly slow making it necessary to save and restart the game to clean up memory allocation.
|
BotF2 (BOTF II)
The BotF2 sequel is in its beginning stages of development. Notable improvements include:
- Higher definition graphics and resolution-scalable interfaces.
- More and larger map size choices (the current largest is 80 by 80 or 6400 sectors).
- Semi-transparent windows.
- Enhanced realism / beauty of the solar systems.
- Automatic detection and adjustment to the size of the monitor.
- Cleaner User Interface.
- Broader historic time span from the Enterprise series to Voyager (BOTF covered the Next Generation and Deep Space 9).
- The ability to plot an unlimited nonlinear course for a ship or task force using the CTRL key.
- More buildable technological elements tailored to individual solar systems and races.
- More star base options/types.
- More ship classes and models.
- Ships can be renamed.
- The ship construction queue is separate from the general construction queue.
- Unlimited capacity in each system construction queue.
- New diplomacy interface, interactions, and options.
- New technology interface with improved database information.
- Built-in automatic program updater.
- The addition of the Dominion as a major empire (Replacing the Ferengi who are now a minor race, albeit a particularly powerful one).
- Many more minor races are included, along with unique buildings, bonuses, and ships.
- The minor races will be capable of expanding and forming their own mini-empires.
- Ships will have the ability to scan systems.
These are some of the improvements to the game to date with more on the way.
|
Installation
The installation of the game is straight forward.
The three stages to installation:
1) Installing a Microsoft utility called NET Framework.
2) Unzipping the downloaded file into any desired folder.
3) Creation of a desktop icon shortcut to the game in its folder.
NET Framework 4.5.1 can be found at: http://www.microsoft.com/en-us/download/details.aspx?id=40779 or check here.
|
|
<img size=441> </img> </img>
|
|
To Install the Program:
- Go to the Zip file for BotF2 that you downloaded from the site and double click on it.
- Select: Extract All Files (this is small in windows XP) from the Folder options on the left
- You get a window with: Welcome to the Compressed (zipped) Folders Extraction Wizard
- Click the Next> button at the bottom and get the following window.
- Enter C:\Program Files\Star Trek BotF2 as you see in the example to the left. *Then Click Next> at the bottom.
- You do not have to place the program in C:\Program Files. This is just one suggestion.
|
|
<img size=169> </img> </img>
|
|
To make a desktop Icon:
- Click the Windows Start Button
- Double Click My Computer
- Double Click the C: Drive
- Double Click on Program Files (or your directory for the game)
- Find and Double Click on the folder Star Trek BotF2
- Find the Icon for BotF2Client.exe in the folder
- Right click on it and select create shortcut which is 4th from the bottom -- You will get this
- Click on the blue area and type: “Star Trek BotF2” (replacing “Shortcut to BotF2 Client.exe Shortcut”)
- Hit the enter key and then use your pointer to drag it to your desktop
- Close all the windows
|
Startup
Starting a Single Player Game
Double click on the desktop icon you made. The program may download an update after you start it.
Once the game is running you will see the following Menu in the lower right corner.
In the example all the options are highlighted for clarity. In actual practice, some are dark when not available.
|
|
<img size=200> </img> </img>
|
|
- CONTINUE: Return to current game (i.e. after saving)
- Start a new SINGLE PLAYER Game
- Start a new MULTIPLAYER Game
- LOAD a saved single player GAME OR LOAD a saved multiplayer GAME
- SAVE a single player GAME OR SAVE a multiplayer GAME
- Game Programming and Design CREDITS
|
|
Click on SINGLE PLAYER and you get the following self-explanatory menu. For details see Start Game Panel
|
|
<img> </img> </img>
|
Starting a Multi Player Game
Click on MULTIPLAYER and you get the following menu
|
|
<img size=554> </img> </img>
|
|
To host a multiplayer game:
Enter your player name and your IP address and select HOST GAME at the bottom.
Your game will then appear to other potential players in the box labeled Servers on Network.
For other players to see your host game they can enter your IP address
(Example 192.168.1.22 in the graphic) in the area labeled Direct Connect:
Once you select HOST GAME you will be given a new screen with similar game options as
the SINGLE PLAYER game. Select your options.
Wait for other network players to join the game.
After all their names appear on screen, launch the game with the button in the lower right corner of the main panel.
To Join a Game:
If your program detects other games on the network it will show them in the large box labeled Servers on Network.
You can select one and click on JOIN GAME at the bottom.
You will then be given the option as to which empire you want to play.
Multiplayer Tips:
Due to Feature Overview it's better
- to play without minor races
- turn off races not played by a human
- don't use orbital batteries
Restart a Multiplayer Game:
- the host has just to load the game (or after a crash the first entry "(Auto Save)") and then just repeat the listed steps
|
Loading a Previously Saved Game
Click on LOAD GAME and you get the following menu
|
|
<img size=507> </img> </img>
|
|
As you highlight your saved games,
information regarding the game is displayed to the right in yellow.
This list contains ALL saved games, whether single or multiuser.
Auto Save: BotF2 saves each turn for recovery from crashes.
Highlight and load this option to take up where you left off in the last game you were playing.
|
The Game Overview
Once the game has started you will see the galaxy panel as seen below.
- your selected empire begins in the solar system in the center.
- using the scroll wheel on your mouse OR the Zoom in / Zoom out buttons at the bottom you can zoom the galaxy map in and out.
- each map square is a sector of space that may be highlighted with your cursor. Sectors require exploration.
- double click on an unexplored or empty sector will center in the galaxy display area.
- double click on one of your colonized sectors will switch to the system management display.
- top right, the status to other empires is displayed (red frame=at war, white frame=known, at MP: Tooltip, who plays which race, non-grayed-out empire symbol: player has finished his turn)
|
<img size=957> </img> </img>
|
<img size=200> </img> </img>
|
|
The resources like Raw Materials <img> </img> and Dilithium <img> </img> and Dilithium <img> </img> are desirable for ship construction. They are shown right beside the sun. (For other symbols see here) </img> are desirable for ship construction. They are shown right beside the sun. (For other symbols see here)
The size of the sun image is scaled to the number of planets in the system (maximum of 10).
|
<img size=335> </img> </img>
|
|
Planet Type (B, G, M, K, J etc) is shown below the planet. Right bottom side there may be an additional bonus like food <img> </img> or energy <img> </img> or energy <img> </img> for the planet - just see the tooltip at mouse over the symbol. </img> for the planet - just see the tooltip at mouse over the symbol.
Planets that are terraformed have green letters
Planets that cannot be terraformed have blue letters
Planets that can be terraformed will have red letters
NOTE: the terraforming option is not yet available
Moons come Small, Medium and Large. Any planet can have up to 5 moons.
Moons add to your system population when the structure Moon Habitation is built on them.
|
<img size=335> </img> </img>
|
|
The small sunburst icon <img></img> indicates extra energy production capacity for the entire system.
The small green plant icon <img></img> indicates extra food production capacity for the entire system.
Asteroids (far left) can be mined for raw materials. The asteroid sweeper increases this by 40% (in build menu page 17).
Systems with gas giants (Type B planets) or crystalline planets generate 10 deuterium/turn/planet.
Other stellar bodies that can appear in sectors include Neutron Stars, Quasars, Radio Pulsars, X-Ray Pulsars, Black Holes, Nebulae, Rogue Planets and eventually wormholes.
Rogue planets will be found in Nebulae much like the Omarion Nebula where the Dominion home world is found.
|
Summary display - Galaxy Panel
|
Place on Screen: <img size=80> </img> </img>
<img size=258> </img> </img>
|
|
- Click to TURN to play turn (you are about to play TURN 1).
- Click for SUMMARY of events that occurred at last turn.
- Info of entire empire:
- Credits can be used for diplomacy with minor races but will have minor effect on empires. They are also used for ship maintenance. Not implemented yet.
- Current Credits per Turn (for the previous turn). Credits are taxes paid by the empire’s population and increase as your population increases.
- Morale: Empire population average. See page 29.
- Research Points are displayed as total accumulated followed by current points per turn after the slash (from the powered research facilities in your empire).
- Intelligence Points are similarly based on the total number of Intel facilities in your empire.
- Requisition summary for entire empire: The Requisition materials are necessary for ship building. (Note: This example also shows the starting resources for each player at the beginning of a new game at the beginning tech level. You get more if you start at higher levels.)
- Dilithium, deuterium (starship fuel) and raw materials are stockpiled and available to the entire empire.
- Dilithium on hand / Produced last turn
- Deuterium on hand / Produced last turn
- Officers on hand / Trained last turn (out of the game meanwhile)
- Raw Materials on hand / Mined last turn (renamed -> Duranium)
Make sure:
- The dilithium refinery is built and powered.
- The deuterium plant is built and powered.
|
Important GALAXY display buttons
<img size=258> </img> </img>
- ECONOMY: This button changes the GALAXY display to show TRADE ROUTES. The Task Force display changes to show trade route(s) available in your currently highlighted system.
- MILITARY: This is the default setting when the game starts. The button replaces the TRADE ROUTES display (in the lower left corner) with the TASK FORCES display.
- ZOOM IN: This button magnifies the GALAXY display. Each sector appears bigger and its text larger.
- ZOOM OUT: This button lets you see more sectors in the available space. The detail gets smaller and text can become too small to read.
- Note: the ZOOM IN and ZOOM OUT buttons have the same effect as the scroll wheel on pointing devices (mouse or track ball).
- Multiplayer chat: Select the CHAT button to communicate with others in a multiplayer game. The option is given to either send a message to all players or select a subset of players. The SYSTEM display changes to a text line for typing a message. At this time the CHAT button does not highlight pink when it is selected and either the MILITARY or ECONOMY button appears to remain active. You must re-click the CHAT button to close the text space and cancel CHAT mode.
|
ECONOMY button - Trade Routes
|
Place on Screen: <img size=80> </img> </img>
<img size=262> </img> </img>
|
|
As a system’s population expands a new trade route is created at multiples of about 150 (for details see Table#TradeRoutePopReq). Some buildings give additional trade routes or more trade income (see Database).
The graphic at left shows an UNASSIGNED trade route for the solar system currently highlighted.
Assigning a trade route increases the number of credits accumulated with each turn.
Your trade routes are seen by selecting the ECONOMY button between the galaxy and system display.
Detail on trade routes, trading and how to assign them is discussed on page 26.
<img size=569> </img> </img>
|
|
<img> </img> </img>
|
|
You will often jump between the ECONOMY and MILITARY buttons in managing your empire.
When the MILITARY setting of the GALAXY display is selected, a list of the ships you have (if any) in a selected sector appears in the lower left corner of the GALAXY panel under the title TASK FORCES (see next section). The graphic at the right shows a sector (Sol) with one or more ships in it as indicated by the Starfleet emblem in the corner.
In the original BOTF, switching from MILITARY to ECONOMY hid the icons for military ships.
|
Task Force Deployment
The following display is in the lower left corner of the GALAXY panel when in MILITARY mode.
|
|
<img size=600> </img> </img>
<img> </img> < - > <img> </img> < - > <img> </img> </img>
|
|
The task force display of the main galaxy interface lists the ships in the currently selected sector. In the example screen shot you might think of each individual ship as its own “task force” as none of them are grouped yet. However, you can REDEPLOY more than one ship into a Task Force group.
The only purpose of Redeployment is to make ship movement easier. Grouping in task forces, saves you the tedium of individually directing each ship to the same place. At the bottom of the display is the button to REDEPLOY SHIPS. If a fleet contains several ships, you can use CTRL-KEY to move several ships at once.
When you select the REDEPLOY SHIPS option, the GALAXY display is replaced by a display showing the ships listed in the Task Forces display (seen at left). The REDEPLOY SHIPS button also changes to ACCEPT DEPLOYMENT as seen above.
Click on ACCEPT DEPLOYMENT to return to the GALAXY display after redeploying your ships.
RENAMING
In BotF2, ships can be renamed in this screen. The new name will appear in the next turn (not before) in place of the text you see in the TASK FORCES display example above. Thus, the “Heavy Cruiser II” might be renamed as “NCC 530 USS Venture.”
In renaming ships you may want to adopt a convention of numbers for the different types of starships so that you can identify what type of ship it is. An example would be numbers in the 500’s for Heavy Destroyer II’s. You could also say HDII USS Venture or something that makes sense to you.
|
|
|
Ship's Status
While you are in REDEPLOY SHIPS mode you can look at each ship’s status by selecting one of the ships in the vertical TASK FORCES list.
The status of all the ships appears in the display at the bottom of the panel as depicted in the picture to the left.
The three colored indicators to the left of each ship are (from left to right):
- Shield strength (maroon)
- Hull integrity (green)
- Deuterium (yellow)
Ships draw deuterium from your empire’s stockpile when they are moving inside their refueling range (shipyards and outposts). They only consume fuel reserves when outside the refueling range.
<img size=262> </img> Place on Screen: <img size=80> </img> Place on Screen: <img size=80> </img> </img>
Scrapping ships
For ships scrapping is available by right-click option at this position, not at Task Forces.
|
|
Place on Screen: <img size=80></img>
<img size=522> </img> </img>
|
|
Right clicking on a ship in the task force panel brings up options appropriate to the ship in its current location.
Most ships have weapons but currently not all have the option to engage (enter battle with rival ships).
- Battle capable ships can:
- Engage
- Avoid
- Escort (if other ships are in the same sector)
- Construction ships can: (this currently has a bug in it and may cause crashes)
- Avoid
- Build station (the selection of station(s) to build is limited to your tech level)
- Colony ships can:
- Engage
- Avoid
- Escort or Colonize system (if they are in a system that can be colonized)
Scrapping ships: for scrapping ships see previous capital
Ship’s scanning: Scan Power is not the same as Sensor Range. Range signifies the outer limits a scan can reach. Scan Power signifies the accuracy and resolution of a scan. Scout ships have the highest resolution scanning capability.
|
|
<img size=522> </img> </img>
|
|
At the left is an example of the ship movement flexibility in BotF2. Holding the CTRL key while clicking the cursor on a sector creates a waypoint (directional shift) in any sector you choose. There are six waypoints in this example. The Starfleet insignia represents a ship or task force. The insignia is of course, race specific.
The <img> </img> in the last box indicates the number of turns required to get to that destination.
NOTE: In this image each square is a sector. Sectors are color coded if controlled by an empire. Contested sectors have a spectrum / rainbow effect. </img> in the last box indicates the number of turns required to get to that destination.
NOTE: In this image each square is a sector. Sectors are color coded if controlled by an empire. Contested sectors have a spectrum / rainbow effect.
Sector Colorization:
- Blue = Federation
- Yellow = Cardassian
- Violet = Dominion
- Red = Klingon
- Green = Romulan
- Grey = Minor Race
- Rainbow = Contested
|
|
<img size=522>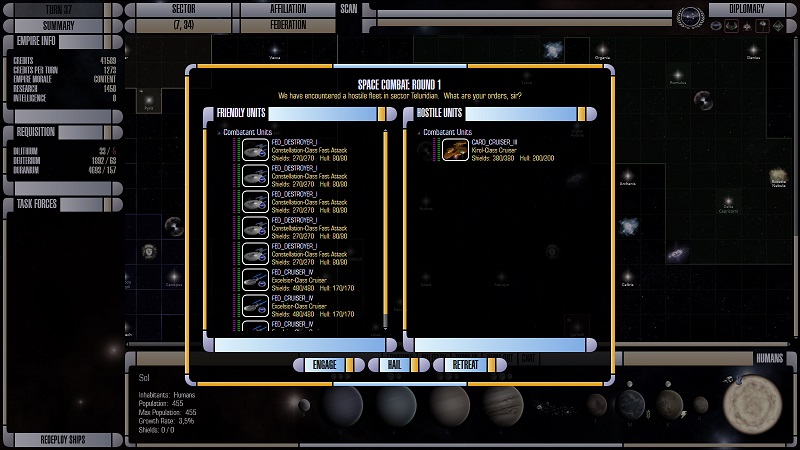 </img> </img>
|
|
|
|
<img size=522>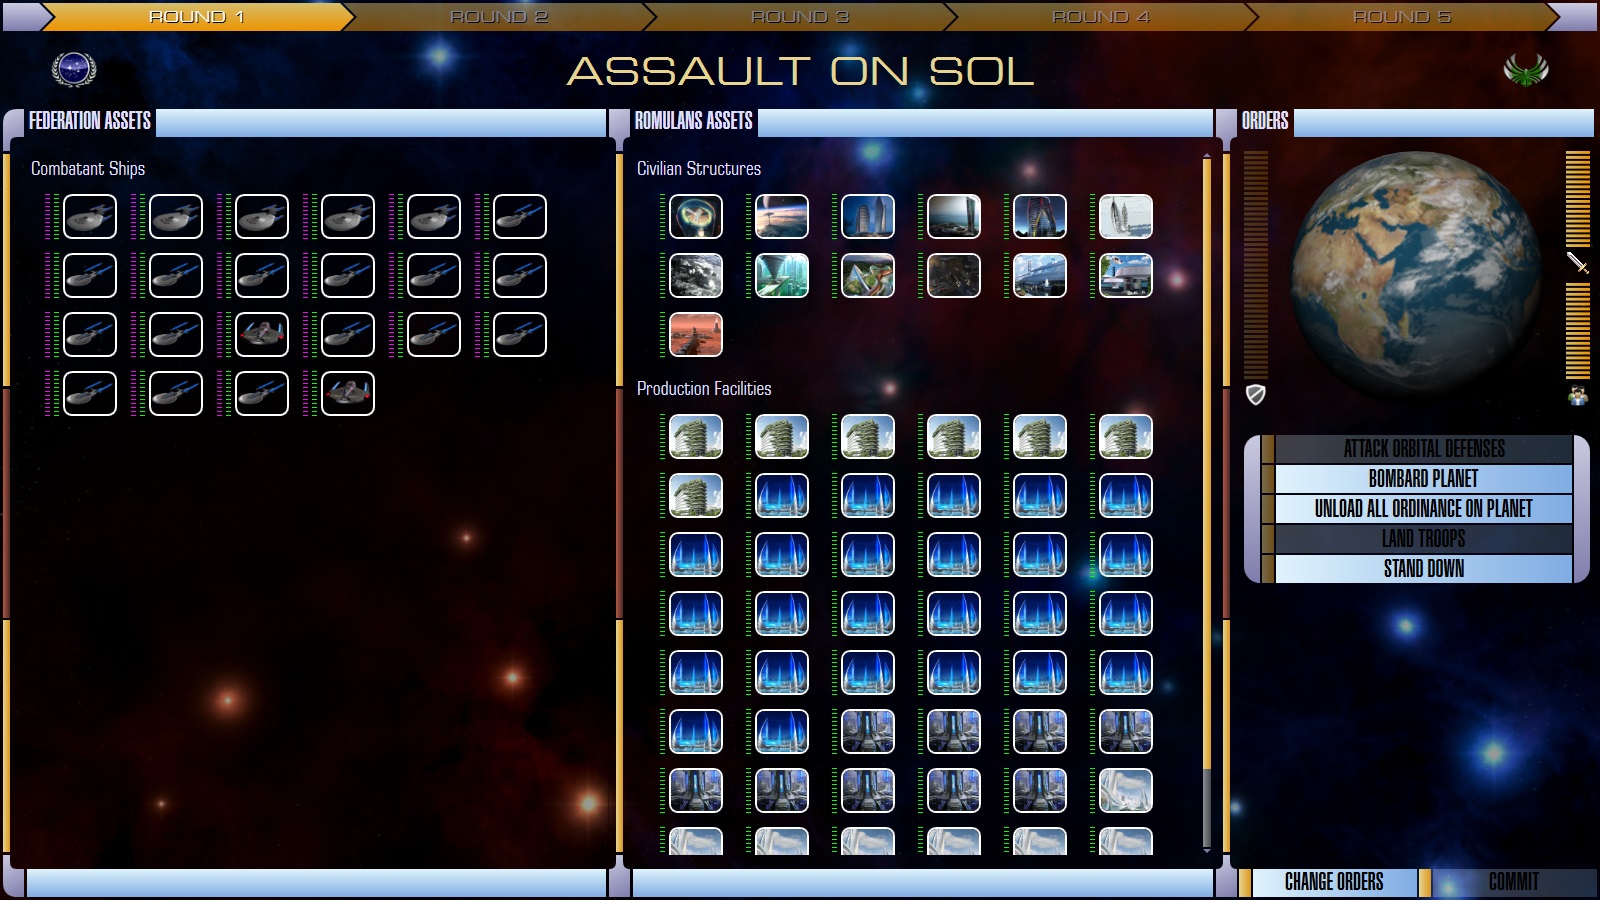 </img> </img>
|
|
System Assault is done in five rounds (see in the screen yellow top bar)
- on the left side the attackers assets are shown (combatant ships)
- in the middle assets of the defender race are displayed
for both: use tooltips displayed at mouseover
- on the right side headlined with "Orders" (use also tooltips here especially for the bars !!!)
- left hand defender shield strength is displayed by a vertical bar (if defender doesn't have shields/ a shield generator it is offline, of course)
- right hand DefenderCombatStrength + DefenderPopulation is displayed by a vertical bar
then Actions (not all are everytime available):
- Attack Orbital Defenses (only if orbital defenses are there)
- Bombard planet
- Unload all ordinance on planet
- Land Troops
- Stand down
at bottom there are:
For more details see System Assault
|
|
<img size=300> </img> </img>
|
|
If you right click in any open portion of any of the game’s panels you will get the menu to the left.
This menu is used to maneuver between the five different panels for game management and opening menu. They are:
- MAIN – galaxy panel (also F1-Key)
- SYSTEM – colony management panel (also F2-Key)
- EMBASSY – diplomacy management panel (also F3-Key)
- SCIENCE – research management panel (also F4-Key)
- INTEL – intelligence management panel (also F5-Key)
- MENU – main menu (also ESC-Key from Galaxy Panel)
The MENU (main menu) selection is where you save your game and resume OR save your game and exit (discussed on page 7).
If you accidently get the Pop-up Access Menu and want to cancel it, just click on a free portion of your current panel outside of the Pop-up Access Menu and it will close.
- Code to control what empire theme is used is located in ClientModule.cs
       private void OnGameStarted(ClientDataEventArgs<GameStartData> obj)
       {
           UpdateCommands();
           if (_appContext.IsGameInPlay)
           {
               //    GameLog.Client.GameData.DebugFormat("ClientModule.cs: LocalPlayerRace={0}, EmpireKey={1}", _appContext.LocalPlayer.Empire.Race.Name, _appContext.LocalPlayer.Empire.Key);
               if (_appContext.LocalPlayer.Empire.Key == "INTRO")
                   LoadTheme("Intro");
               else if (_appContext.LocalPlayer.Empire.Key == "FEDERATION")
                   LoadTheme("Federation");
               else if (_appContext.LocalPlayer.Empire.Key == "ROMULANS")
                   LoadTheme("Romulans");
               else if (_appContext.LocalPlayer.Empire.Key == "KLINGONS")
                   LoadTheme("Klingons");
               else if (_appContext.LocalPlayer.Empire.Key == "CARDASSIANS")
                   LoadTheme("Cardassians");
               else if (_appContext.LocalPlayer.Empire.Key == "DOMINION")
                   LoadTheme("Dominion");
               else if (_appContext.LocalPlayer.Empire.Key == "BORG")
                   LoadTheme("Borg");
               else if (_appContext.LocalPlayer.Empire.Key == "TERRANEMPIRE")
                   LoadTheme("TerranEmpire");
               else
                   LoadDefaultTheme();
               //    //"else"....old version
               //    LoadTheme(_appContext.LocalPlayer.Empire.Key);
           }
|
|
MAIN – galaxy panel: You have already been introduced to the galaxy panel which is the first panel you see on startup. No matter where you are in the program, you can return to it by clicking on MAIN (in the upper left corner with a galaxy graphic) in this pop-up menu.
In the following pages we will look at the System, Embassy, Science and Intel Panels.
NOTE: In the current version of the game the Embassy and Intel Portions are only rudimentary (pages 21 and 22).
|
Hotkeys
At the moment there are only known the hotkeys from above (F1-F5 + ESC). For more see also (later) Hotkey.
|
|
<img size=504> </img> </img>
|
|
The smaller display in the upper left corner <img> </img> (below the summary button) contains the same information as in the Summary Galaxy Display but on a system level. </img> (below the summary button) contains the same information as in the Summary Galaxy Display but on a system level.
Above it is the SUMMARY button <img> </img><img>http://botf2.square7.ch/wiki-files/images/manual/red_2.png</img>. Click this to review events occurring in the last turn. Knowing this is useful for system management. In the future summary text will be color coded. </img><img>http://botf2.square7.ch/wiki-files/images/manual/red_2.png</img>. Click this to review events occurring in the last turn. Knowing this is useful for system management. In the future summary text will be color coded.
In the lower left corner is the display called the BUILD QUEUE <img> </img>. Items are added here from the BUILD LIST (page 17) <img> </img>. Items are added here from the BUILD LIST (page 17) <img> </img>, a selection at the top of the panel. It is enlarged at the right (BUILD LIST highlighted). <img> </img>, a selection at the top of the panel. It is enlarged at the right (BUILD LIST highlighted). <img> </img> </img>
<img> </img> The production display is used to assign the population labor pool for a (solar) system to key areas of growth and development. As population grows they must be assigned from the Labor Pool (at the bottom of the panel)<img> </img> The production display is used to assign the population labor pool for a (solar) system to key areas of growth and development. As population grows they must be assigned from the Labor Pool (at the bottom of the panel)<img> </img> to one of the work areas (at the top)<img> </img> to one of the work areas (at the top)<img> </img>. </img>.
Labor can be allocated to food, industry, energy, research, or intelligence output. Moving labor requires that you subtract some, or all of the population from one production area, which adds population blocks to the Labor Pool at the bottom of the screen. You may then add labor to any of the other four work areas using the onscreen slider shown at the right.
Or single click an orange bar at the level desired.<img> </img> </img>
Recycle Unused Structures: Left click on the production icon to scrap one more at the next turn, right click on the same production icon to reduce the number scrapped at the next turn by 1.
|
Structure Option
<img> </img> Any structures you have built in a system are listed under this panel choice. If they are lit, they are powered. If they are not lit, they are not powered. If extra power is available, click on an unlit structure and it will power up. Click again to power it down. Right click on the structure and you can “Scrap” it. Scrapping a structure returns 25% of its build cost in credits to the Empire. </img> Any structures you have built in a system are listed under this panel choice. If they are lit, they are powered. If they are not lit, they are not powered. If extra power is available, click on an unlit structure and it will power up. Click again to power it down. Right click on the structure and you can “Scrap” it. Scrapping a structure returns 25% of its build cost in credits to the Empire.
|
|
<img size=504> </img> </img>
|
|
In the picture there are 9 automated structures (not requiring a labor force) that have been built in this system.
The system is pictured at the bottom.
Viewing your solar systems: <img> </img> </img>
There is a dropdown menu at the top to jump to management of your other systems (click the arrowhead at the right to open). This systems list is scrollable.
The drop down menu is not alphabetized but instead kept in order of colonization or annexation. If you have many systems, you can start typing the name of the system on your keyboard while the menu is open and the program will jump you to the system name you are typing.
Click on it and the displays change to information for the selected system.
|
Build list Option
<img> </img> This display lists what is available for building based on technology level and previous construction. Yellow lettering indicates structure upgrades as science progresses. These are always at the top. Single click on the listed items to view and read about them. </img> This display lists what is available for building based on technology level and previous construction. Yellow lettering indicates structure upgrades as science progresses. These are always at the top. Single click on the listed items to view and read about them.
|
|
<img size=504> </img> </img>
|
|
- Adding items to the queue:
Double click on the line item to add it to the BUILD QUEUE on the lower left. Objects that may only be built once will be removed from the build list after being selected.
Some objects may be built more than once. In these instances, the object will NOT be removed when selected. Two examples are food production structures (farms) and manufacturing structures (mass replicators or fabrication plants). In addition, these and other structures can be upgraded as technology advances (the yellow line items). When ordering upgrades to these structures the original structure will be removed from the build queue, since it makes no sense to put a lower technology version of the structure in the queue AFTER its upgrade. Instead, when the upgrade is done, the next tech level of the structure appears in the BUILD LIST.
- Removing items from the queue:
To remove an element from the BUILD QUEUE, single click on it and it disappears. Items in the queue below it move up. Adding the item again will place it at the bottom of the list.
- Special structures for minor races:
Minor races cannot build their own “special structures”. These structures are unique to a race and may help morale and/or give bonuses. Sometimes the structure hurts morale. Empires can build these structures when the race has been annexed but NOT when they have been subjugated. If the minor race leaves your empire, the structures are lost.
|
Shipbuilding Option
<img> </img> Ships available to your current technology level are listed and described. </img> Ships available to your current technology level are listed and described.
- Docks of your shipyard is shown:
<img>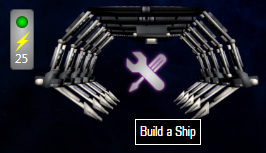 </img> </img>
- In the middle of dock one (or two or three) this symbol <img>
 </img>shows that no ship is currently build. Click on it ! (Sometimes it is not violet highlighted than just select another screen and come back to this screen </img>shows that no ship is currently build. Click on it ! (Sometimes it is not violet highlighted than just select another screen and come back to this screen
- Single click to add a ship build order to an open dock.
- Single click on the ship in the dock to remove it if you make an error in selection.
|
|
<img size=504> </img> </img>
|
|
In the image the Frigate I is highlighted in blue and appears in the panel in the upper right corner. Data are shown just below. The system where the ship is undergoing construction appears in the bottom panel. Dry docks for ship building are built in the build queue. As technology advances, you can build dry docks with the capacity for up to 3 ships at a time. Basic shipyards have 1 dock. Medium shipyards have 2 docks. Advanced shipyards have 3 docks.
You can catch the rotating modell with left mouse click or pull it to any direction you want to.
|
|
<img size=507> </img> </img>
|
|
<img> </img> </img>
In the example, Superconductor technology is highlighted in blue (enlarged in inset).
<img> </img> </img>
The bottom panel shows what structures have become available when superconductors are researched.
- Yellow highlighted technology has been researched.
- Bright white are currently partially researched.
- Grey topics have no completed research.
<img> </img> </img>
This portion of the display indicates the tech level a given field of science has reached (you have reached Level 10).
The yellow bars graphically indicate the percentage of overall research effort allocated to the research area in question.
There are six areas of research: Biotech, Energy, Computers, Propulsion, Construction and Weapons.
Allocate science resources by shifting them from one area to another. Once you are satisfied with an allocation it can be locked by the little yellow and grey icon to the right of the percentage (currently locked at 17% as seen above). If you increase research resources to an unlocked area, resources have to be subtracted from other unlocked areas (evenly). In this way, having five of the six research areas locked is the same as having them all locked.
Click on the icon to unlock it. <img> </img> (UNLOCKED) </img> (UNLOCKED)
|
Encyclopedia option
<img> </img> At the top you can select the Encyclopedia and look at the total technology available in the game. </img> At the top you can select the Encyclopedia and look at the total technology available in the game.
|
|
<img size=493>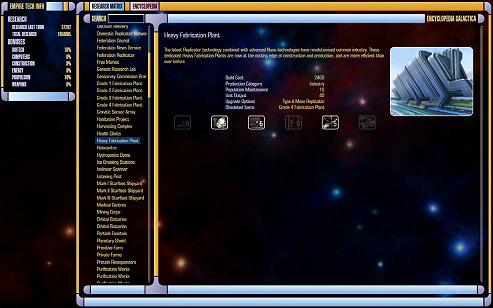 </img> </img>
|
|
Highlight a technology item and an image and description are shown. Research levels needed for its production are also displayed and will be brighter (lit up) and contain a number for the level required. In the example above there are four tech icons lit with a number in them. Therefore an Advanced Solar Array requires those 4 items researched to a level four technology. The dark tech icons are research areas not necessary for the structure highlighted (i.e. you don’t need any weapons technology for an advanced solar array).
The list is topical with major headings for Buildings, Ships and Star bases, etc and you can collapse sections by clicking on the white pointer to the left of the white topic text.
The panel in the upper left corner shows your overall research capacity based on the number of universities with personnel assigned (Federation). Bonus research capacity is granted by other special structures that can be built. These vary between the major races available for play.
- The Daystrom Institute or other race research facility
- Subatomic Simulators or race equivalent
- ASDB Complex (Advanced Starship Design Bureau) or race equivalent
- Genesis Research Lab or race equivalent
- Spacedocks, Science Stations, Outposts and Starbases
- All ships
|
Embassy Panel
<img> </img> </img>
In this display, if you click on one of the race pictures the display rearranges to show the diplomatic relationships. The Reset Graph selection at the lower right returns you to the full display. The lines to minor races will eventually be color coded in red for a state of war and green for a mutual alliance.
|
|
<img size=1009>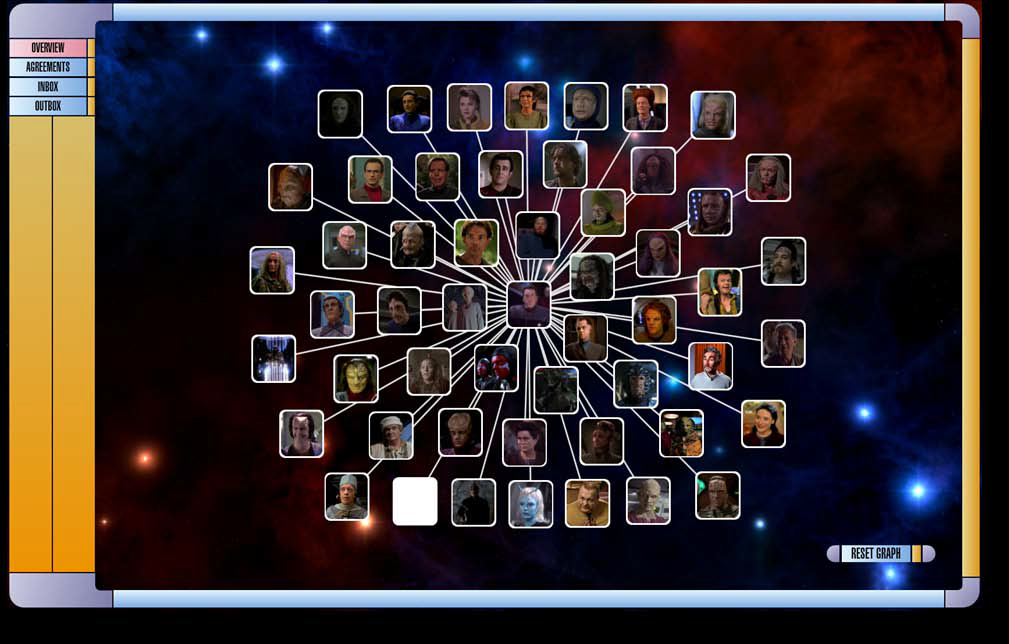 </img> </img>
|
|
|
|
<img> </img> </img>
|
|
- Agreements: The list of current treaties in place.
- Inbox: Incoming messages from major and minor races.
- Outbox: Crafting messages to major and minor races.
|
|
<img>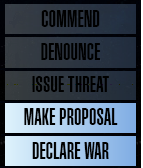 </img> </img>
|
|
This function is more developed and shows a list of civilizations you have encountered at the top. It is not currently functional.
Future options for the “outbox” are shown at the right. They include COMMEND, DENOUNCE, ISSUE THREAT, MAKE PROPOSAL and DECLARE WAR.
|
Diplomatic strategy
Winning over races in the Embassy portion involves financial gifts and diplomacy backed by a good intelligence network.
Familiarize yourself with each alien race. Not all races respond to money and some (Example - Vulcans) can be insulted by it.
|
Intel Panel
At this point this option has no programming behind it and is for display only. Meanwhile this screen was replaced. Also Agents are replaced at the moment. So there isn't any kind of intelligence playable.
|
<img size=509> </img> </img>
|
|
|
|
Summary is mostly shown after beginning a new round. It can be displayed manually by pressing "SUMMARY" button.
|
|
<img size=509>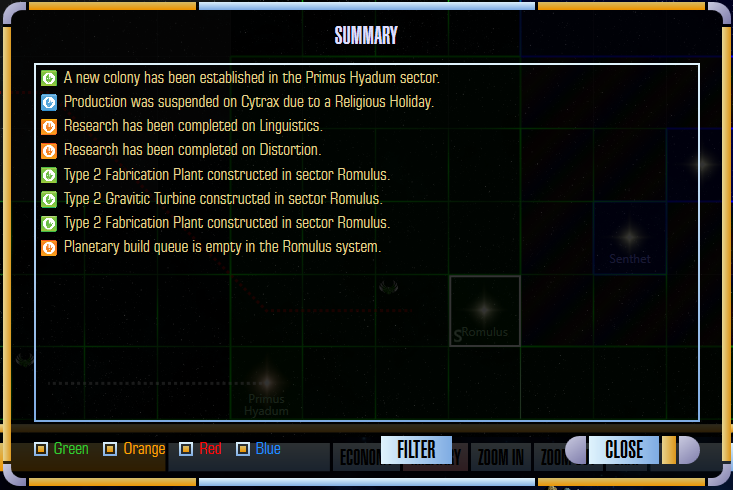 </img> </img>
|
|
At bottom some news can be dis-selected by de-activating the special color.
- Green is for mostly unimportant news (compare with the image)
- Orange is for ? (compare with the image)
- Red is for ? (compare with the image)
- Blue is for ? (compare with the image)
|
Game play tips
- In a newly colonized system, build a power structure first. Examples would be a charge collector, wind turbine or solar array – a power generating unit that requires the fewest turns.
- Build a structure for producing food as your second choice,
- followed by dilithium refineries,
- deuterium plants and
- a ship construction facility. However, even though shipyards can be built in any system there is little point in building one in a system with a limited population capacity and therefore low industrial output – ships will take forever to be built there. It is better to develop these systems toward specialization on intelligence or research.
- Size up your population versus food production capacity and get started on increasing food production if needed. The population grows relatively fast in this game. You should be able to knock this out and then move on to other structures.
- Systems need food to grow and should always have spare capacity just in case.
- Food is stockpiled but stockpiles won’t last long when the people are hungry.
- It is better to build a manned food facility (automated farm under production option in the system management panel) rather than a special building in case the energy is needed to power another building. This prevents starvation and loss of morale.
- Facilities also produce more food per building than special structures generally do, and they are frequently upgradeable.
- Early on, focus on developing your new colonies’ food, energy, and industrial output.
- Don’t bother building intelligence or research buildings until it is developed enough to support them without adversely affecting growth.
- Watch your systems for the allocation of population to industrial activity. As the population expands it isn’t always assigned to work areas.
|
Part 2: Contents - Game Detail
missing yet
|
Part 3: Reference
not complete yet
|
Manual Credits
Manual by Captain Bashir with thanks to Matress_of_Evil, .Iceman and Zeleni
|
 </img> Manual.pdf D, <img>
 </img> BotF2 Manual French D